来源:网络 作者:佚名
教程不仅介绍了通道抠图的过程,同时还介绍了一些细节的处理方法。如抠出的婚片带有很多环境色,如果婚纱是白色的就直接用减淡工具涂白。
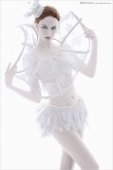
原图

最终效果


1、这张图像的特点是婚纱四周界限分明,可以用磁性套索工具选取;难点是怎样抠出半
透明婚纱。用
通道抠图可以抠出半
透明的效果。
2、打开通道面板,选择反差最大的通道,这里是绿色通道。

3、复制一个绿色通道。

4、为了增加颜色反差,点击图像-调整-色阶。

5、打开色阶面板,把两边的三角形往中间拉。

6、用磁性套索工具沿着婚纱的边缘让它自动选择背景,当然也可以选择婚纱,然后点击选择-反向。

7、用油漆桶将背景填充成黑色,或点击编辑-填充-黑色。上面已经讲过,黑色是透明,所以要将背景涂成黑色。

8、因为白色是不透明,所以要将图像中不透明的地方涂成白色。 点击选择-反向,把图像选定,这样可以防止涂抹到背景上,然后将画笔调成白色,沿着人体不透明的地方涂抹,首先把画笔调小,沿着边缘涂抹。