来源:网络 作者:佚名
素材图片婚纱的背景非常复杂,有天空也有地面,有裙子也有飘飞的部分。抠取的时候,我们需要分开来抠,先用钢笔工具把裙子按构成分段,然后再结合通道及蒙版抠出每一部分,这样就可以完好的保持婚纱的细节。
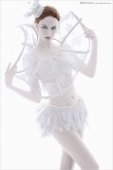
原图

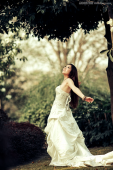
最终效果

加上背景效果

1、点击原图打开原图素材大图,右键选择“图片另存为”保存到本机,然后用PS打开保存的素材大图。
用
钢笔工具把整体先
抠出路径,如下图,这一步比较重要,可以减少外围环境影响。

2、按Ctrl + 回车把路径转为选区,再按Ctrl + J 把选区部分的图像复制到新的图层,如下图。这样我们就得到人物整体的效果,后面会用到。

3、把抠出的人物部分图层隐藏,回到背景图层,如下图。

4、进入
通道面板,分析一下各通道,红通道
细节非常不错。

5、把红通道复制一层,得到红副本通道,然后调出人物部分的选区,按Ctrl + Shift + I 反选然后用油漆桶工具填充黑色,取消选区后如下图。

6、我们先来抠出婚纱顶部区域,用钢笔构成下图所示的路径。

7、按Ctrl + 回车把路径转为选区,再按Ctrl + Shift + I 反选,用油漆桶工具填充黑色,取消选区后效果如下图。

8、按Ctrl + L 调整色阶,把暗部压暗,高光部分稍微调亮,参数设置如下图,然后确定。

9、按住Ctrl + 鼠标左键点击红副本通道缩略图载入选区,如下图。

10、点RGB通道返回图层面板,把抠出的人物图层复制一层,然后添加图层蒙版,如下图。

11、在背景图层上面新建一个图层,用油漆桶工具填充淡蓝色:#83A8DD,我们就可以看到抠出的婚纱部分,如下图。

12、把其它图层隐藏,只保留背景,然后回到背景图层,如下图。

13、进入通道面板,把红通道复制一层,如下图。

14、按Ctrl + L 调整色阶,参数及效果如下图。


15、现在来抠去中间部分,用套索工具勾出下图所示的选区,羽化6个像素后按Ctrl + Shift + I 反选,然后用油漆桶工具把选区填充黑色,再取消选区。


16、按Ctrl + M 调整曲线,再调暗一点,效果如下图。

17、按住Ctrl + 鼠标左键点击当前通道缩略图调出选区,点RGB通道返回图层面板,新建一个图层,填充白色,取消选区后用涂抹工具涂抹顺畅一点,,便于参考可以把淡蓝色背景层显示出来,效果如下图。

18、同上的方法抠出下图所示的部分,过程如下图。


19、接着抠出右侧的褶皱部分,如下图。